
Proportion Practice: Read the article, then download the worksheet!
Figure drawing is a challenging pursuit. To be competent at drawing the body you have to seamlessly integrate knowledge of gesture, weight, anatomy, and perspective. It’s challenging… but it’s also rewarding. You can’t escape learning the principles of figure drawing unless you’re making a comic about an inanimate object, so in the end, difficulty is somewhat of a moot point. You will learn to draw the human form (if you haven’t already) so you might as well discover how to love it now. Take heart! We here at Making Comics will be here to help every step of the way. The first step is learning to see the body in terms of basic shapes, and how those shapes relate to one another in terms of relative size (also called proportion).
This is not a guide about how to draw the figure. This is a guide about how to see the figure. In future articles we will be addressing the actual process of drawing the figure in detail.
Basic Shapes

The human form looks complicated at first glance, but if you reduce it to basic shapes it’s actually fairly straightforward in terms of construction. Starting from the top — the head is essentially an oval, as is the rib cage. The pelvis can be represented either as an oval (oriented horizontally) or a squat cylinder. The arms and legs are made up of two cylinders that bend about a center joint. Speaking of joints, feel free to visualize the sockets of the shoulder, elbow, hip, and knee as circles. The hands and feet can be reduced to flattened wedge shapes.
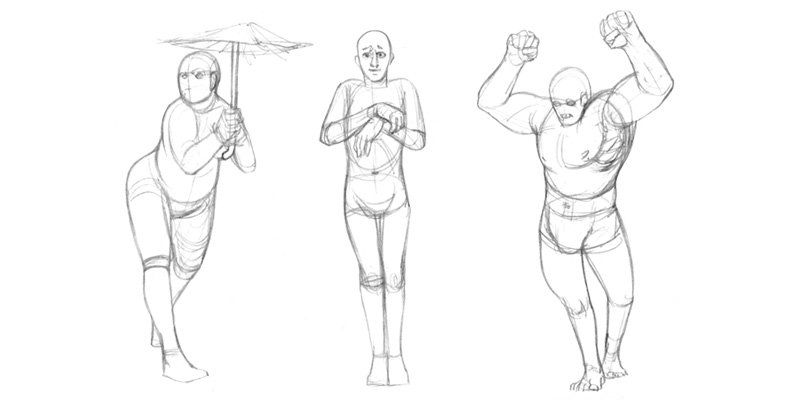
Study the following sketches and look for the underlying shapes in these figures:
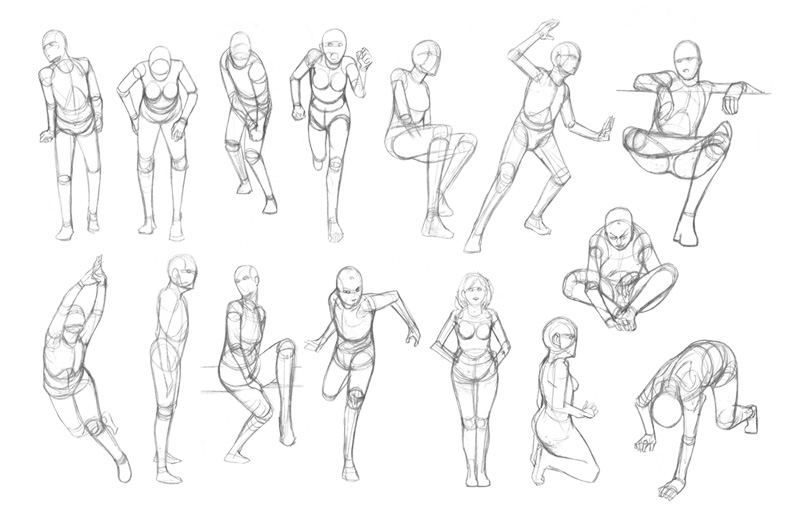
Figure Drawings Constructed With Basic Shapes
More than anything, learning to see the figure in this way will provide you with a clear hierarchy of shapes that can be manipulated to draw literally any pose imaginable. In each instance I started with the head shape (which has a tilt and attitude that carries through the figure) before continuing the motion through the torso. The torso, made up of two major masses, has limited mobility (it can only twist a little and bend in the forward direction).The cylindrical arms and legs branch off of the torso and can move independently from the main thrust of the pose.
Next, let’s examine each of these elements in greater detail.
The Head
You can afford to less precise with other elements of the figure but you really have to nail the head to be successful. In essence, it’s an oval when seen from the front. From the side (in profile) the head is a combination of a perfect circle (the main mass of the skull) overlapping a flattened oval (the face).
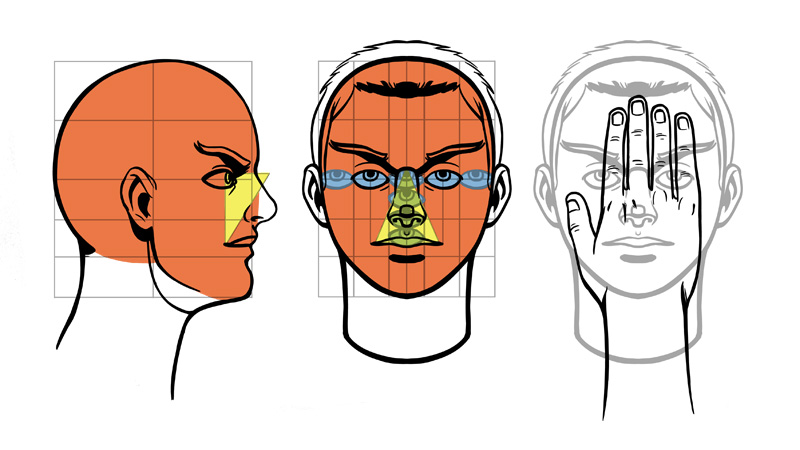
Now for the proportion measurements (how the sizes of the various features relate to one another): halfway down the head is where the eye line goes. This line is an imaginary guide whose purpose is to help you place the eyes on the face. Of the remaining lower half of the head, if you divide that portion into thirds you will have the guides that allow you to place the base of the nose and the bottom of the lower lip.
Much in the way the head is used to measure proportions of the body, the eye can be used to measure the proportions of the face. Both eyes are set about one eye-width apart from each other and are one eye-width from the sides of the head. If you were to stack them vertically, the nose is three eyes long, with the mouth located one eye-height below the base of the nose.
The mouth is centered on the head with a width of about two eyes, so if you drop a line straight down from the center of each eye you will find the corners of the mouth. Additionally, the width of the mouth forms one side of an imaginary triangle that peaks at the bridge of the nose. If you connect all the points of the triangle it will tell you where to place the outside of the nostrils. You can apply a variation of this trick to place the nostrils on a head in profile (see the example above).
Lastly, a general observation about the relationship between the size of the hand and the face: if you place the heel of the palm of your hand on your chin, your middle finger will just barely hit your natural hairline. That should give you something of an idea of the size of the hand.
The Torso
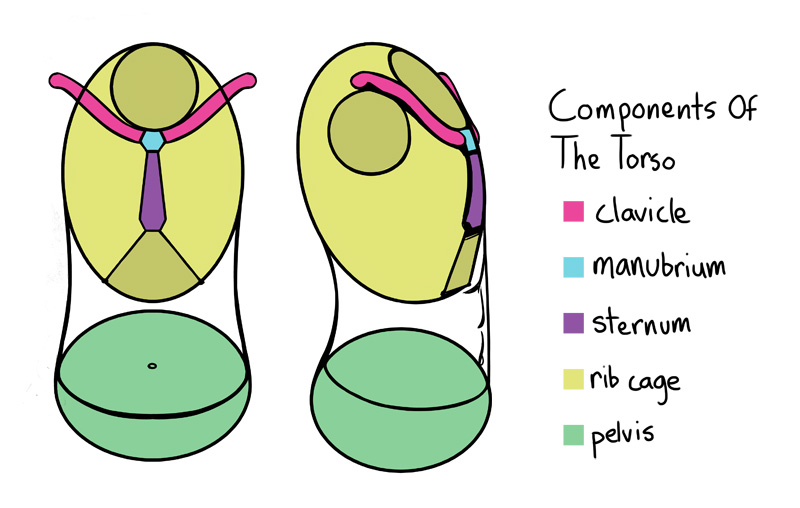
Simplified, the torso is two ovals connected by a flexible, cylindrical volume. Each part is capable of limited independent movement from one another about a flexible rod (the spine) that anchors the rib cage and pelvis in the back of the body.
The rib cage has a handful of important landmarks you should familiarize yourself with. First, imagine that the head connects to the rib cage with a basic cylinder (the neck). At the base of this opening is a point called the manubrium that anchors your collar bones to your rib cage. The collar bones, or clavicles, are an important landmark. When I draw the figure, the second thing I draw after the head is a line approximating the angle of the clavicle. This helps me figure out where the shoulders go and determines the angle of the rest of the rib cage. But I digress.
The clavicles rotate about the manubrium depending on what the shoulders are doing. Below the manubrium is a rigid element called the sternum. Neither the manubrium nor the sternum move and are best thought of as one object attached to the rib cage. And hey — they make it look like your neck is wearing a tie!
The base of the sternum forms the point of another triangle shape. The outside edges are the corners of the rib cage and are visible on most people to a certain extent depending on body type.
The Limbs
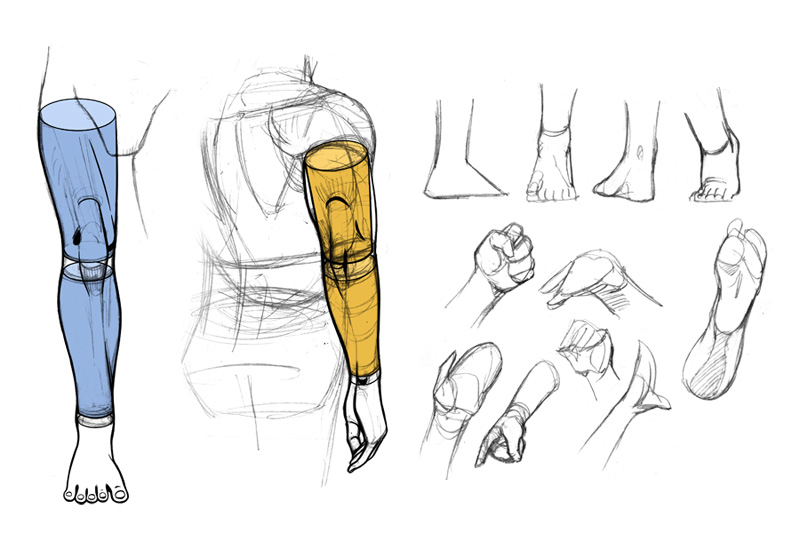
As previously stated, both the arms and legs are comprised of two cylinders connected by a hinge joint. One end of the limb connects to the torso via a ball-and-socket joint (shoulder/rib cage and pelvis, respectively). The far end of the limb terminates in another joint connected with a complex wedge-shape (hands and feet).
It can take some time to feel comfortable drawing hands and feet because of how complicated and articulate they are. For now, try and think of feet as a triangular wedge of cheese that appears rectangular from the front and back. Hands can be reduced to flattened, flexible wedge shapes when open-palmed and circles when closed in a fist (an additional level of articulation would be to also draw the thumbs).
Both arms and legs have a limited range of movement that can only be appreciated with a lot of practice and observation. They rotate freely from the ball-and-socket joint that connects with the body but can only bend in one direction at the knee/elbow. Forearms are constructed with two parallel bones, the radius and ulna, that rotate about themselves at the wrist while connected rigidly to the elbow. This allows you to flip over your palm and causes the shape of the forearm to change in subtle ways. Future articles will examine anatomy in greater detail.
Standard Height Relationships And Proportions Of The Body
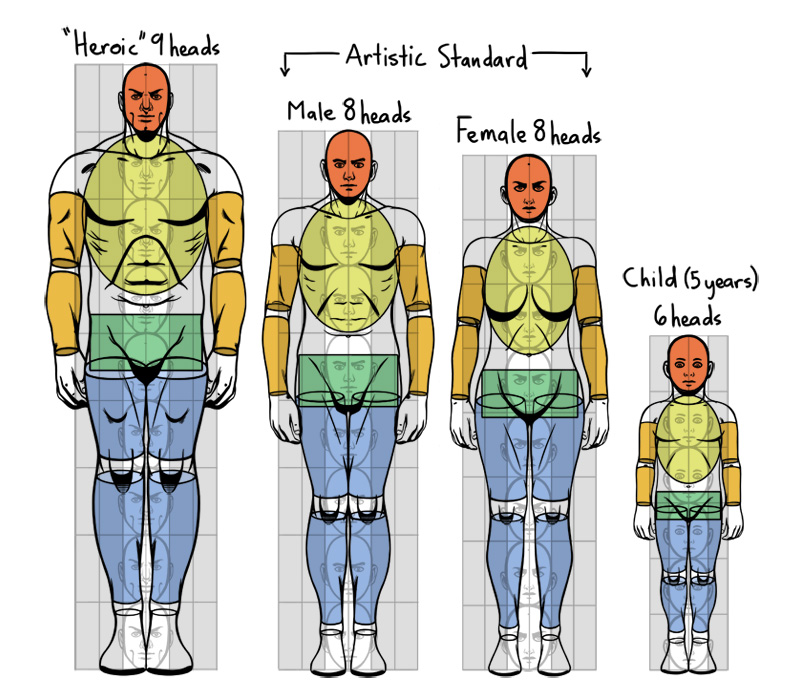
Now that you’ve learned to see the figure in terms of simple shapes it’s time to discuss proportion as it relates to how we measure the rest of the body against the size of the head. The head oval is where most people begin their drawing, which is appropriate because the head size is a tool that we apply against the rest of the figure to make sure it is in proportion. Proportions vary from person to person, but tend to fall within a common range. For this reason, I will begin by discussing the “artistic standard.” There’s a lot to unpack in this chart so let’s get to it.
The average adult human is technically seven-and-one-half heads tall, but the artistic standard for average height is generally rounded up to eight heads. This measurement is only relevant in terms of how the size of the head relates to the size of the rest of the figure, meaning height and proportion are separate things. The average adult female is smaller than the average adult male, however you’ll notice that they are both proportionately similar. This is on account of the fact that the female head is slightly smaller.
“Heroic” proportions measure the body as nine heads tall. These types of figures are superbeings, like ancient Greek champions or comic book superheroes. Heroic figures are a full head taller than average figures and as a result, all of the body is scaled up relative to the head.
As we move backwards in age from adulthood the size of the head gets smaller while the proportion of the head compared to the body gets larger. This diagram depicts an average 5-year-old who stands only six heads tall. The younger the child in question, the bigger the head appears because the proportions of the body shrink in relationship to the head.
Study this chart for where the various landmarks of the body fall. In particular, the crotch/base of the pelvis is generally half the length of the body. The center of the chest is roughly two head lengths down the body while the navel is three heads down. Just above that level (mid-torso) is where the elbow hits. The hands fall between the base of the pelvis and above the knee.
Finally, note that as the scale of the body in relation to the size of the head increases, the width of the body also increases. Average adults have a shoulder-width of a little under three heads, while children have shoulders that measure two heads or fewer.
Proportional Differences Between Men And Women
Aside from primary and secondary sexual characteristics, there are proportional differences between men and women that you need to consider when observing the figure. The first difference lies in the width of the shoulders relative to the width of the pelvis. Men have much narrower pelvises than women do but possess wider shoulders. In general, the torso of a man appears boxy or top-heavy whereas the torso of a woman has more of an hourglass shape. Women possess smaller frames in general than men do and have less defined muscles.
Try and observe (discreetly!) men and women during the day and notice how these characteristics define a person as looking “feminine” or “masculine.”
Non-standard Proportions
One of the complicated aspects of proportion is that few people perfectly conform to the standard. For example, there’s nothing in the standard measurements that accounts for overweight people. Or thin people for that matter. Maybe the figure in question has an unusually long torso and short legs. Once you’ve internalized the measurements of average proportion feel free to experiment with differently-scaled basic shapes. As long as you don’t exaggerate the proportions too far from the average you can have uniquely-proportioned people that look realistic. Push the proportions too far and the figure will look cartoony and exaggerated.
Further Study
There are a number of valuable resources for learning proportion and the basics of figure construction. The hands-down best resource is Figure Drawing For All Its Worth by Andrew Loomis. All of the size-comparison measurements presented in this article were based off of information from Figure Drawing and Loomis has a very thorough and logical approach to deconstructing the figure.
The second resource you should check out is Figure Drawing Design and Invention by Michael Hampton. This is perhaps the most comprehensive guide to figure-drawing and anatomy that I’ve come across and it does a fantastic job of breaking down the structure of the figure into simplified shapes and muscle groups. The one downside is that it’s a pretty dense book, with a lot of advanced material that might be too complicated as a starting resource. If you’re just starting out and can only choose one, go with the first book.
Naturally there are many, many others and we will continue to discuss them in the future.
makingcomics.com
You’re definitely right about basically no one having standard proportions. I tried out putting my palm to my chin to see if my middle finger would go to my hairline. It stopped about an inch away. 😛 Since I’ve done most of my learning of proportion from my own body (it’s a handy reference, pun intended), this explains why I tend to draw fingers a little short.
Thank you for this article, though. I will definitely be referring back to it and the books you mentioned often. 🙂
Fantastic! I’ve never had body dimensions explained so clearly. This is going to be a huge help. Thanks!!
That is an outstanding explanation of anatomy 101.
Thank you! Very helpful! I’ll be sure to share.
One of the nicest things about Andrew Loomis is that his books are now freely available on the internet. “Figure Drawing for all it’s Worth” was published in 1943 so it is now a free license. I have been using his books for the past 3 months and there is a really big difference between now and then. Loomis is funny and encouraging – his personality comes through in his writing. Give him a peek.
Thanks a lot for introducing the books of Andrew Loomis… Had come at a time when my daughter was struggling to make a skeleton with modeling clay and hence had to know about the proportions…
Hola! Where can I find his books online for free? So far I’m seeing them for a charge on amazon~ physical books…
Thanks for the help & info!
Namaste,
Suz Saez
you can download loads of free and p1rated books on PDF drive
its really helpful. thanls a lot.
Really the dept of human torso is about 1/3 of the width.
You draw them like if they’re fully cylindrical.
I noticed this because I observed a lot this proportion on many people, and is one of the hardest thing to understand.
“height and proportion are separate things”
Simple words to explain a thing I always tell even to artists that are far better than me.
This is great!
It’s really helping me improve as alot of my previous drawings have very short arms.
Wow, that is the best info on drawing the figure I have seen. Like fifty lightbulbs all going off one after the other.. thank you so much for this really clear explanation and guidelines. I am off to practise now.
Thanks for your article. Such an inspiration to begin practice again…
thanks a lot
Loved the article and the drawings were very helpful in understanding your points.