Plugins for Wordpress – making your like easier
In the last post, we started to add pages and widgets to the website so it would be a little more functional. Now we need to take advantage of the Wordpress developer community and install some plugins to make our site more effective.
As I mentioned in the first post in this series, one of the best things about WordPress and ComicPress is the large developer community that exists. The incredible number of plugins available help to make Wordpress an incredibly powerful Content Management System (CMS).
We are all squeezed for time almost every day and plugins can save you from fighting with code and trying to make something work. Making your own comic and publishing it weekly on the internet can take enough of your time and luckily, WordPress/Comicpress come to the rescue. Plugins allow you to tie your website together with a Facebook fan page, a Twitter account as well as add in a bunch of tools to make your website more effective for the user. I’ve always thought of plugins as either enhancing how your website “works” or plugins that enhance social media. Below is a list of the plugins that are a good starting point for anyone.
Plugins to enhance your website functionality
Google Analyticator – This adds the necessary JavaScript code to enable Google Analytics tracking on your blog. It also includes several widgets for displaying analytics data in the dashboard.
Why to use it
Probably one of the most important things that you can add to your website, Google Analytics will let you see who’s coming to your site and what they’re looking at. Why is this important? Well if you start posting content that’s really generating traffic, it’s nice to know exactly what content is doing it.
All-in-One SEO Pack – Successful Search Engine Optimization (SEO) is vital to getting more visitors and better results. This plugin allows you to add better SEO to your blog.
Why to use it
SEO is all the rage, right? Any organic hits (i.e. you’re not paying for them) you can generate for your website a bonus and that’s what you should be looking for.
SEO slugs – This plugin removes common words like ‘a’, ‘the’, ‘in’ from post slugs to improve search engine optimization.
Why to use it
What I said with the All-in-One SEO Pack applies here. Anything that you can do to generate more and better quality organic hits is a good thing.
Robots Meta – This allows you to add all the appropriate robots meta tags to your pages and feeds.
Why I use it
Similar to what I said above, meta tags will help with your search engine results and this should enhance the profile of your site – and again more organic growth is a good thing.
Sitemap Generator – There are quite a few different plugins to choose from to generate a sitemap. I’ve always used Dagon Design Sitemap Generator (but I can’t seem to find it through Wordpress, but here’s the link if you’re interested). Otherwise I’d suggest Google XML Sitemaps.
Why to use it
A sitemap of your website will help search engines like Google, Bing and Yahoo to better index your blog. Because of this, it’s much easier for the search engine crawlers to see the complete structure of your site and retrieve it more efficiently. This will lead to better search results and hopefully more organic traffic coming to your site.
Contact Form 7 – This can manage multiple contact forms, plus you can customize the form and the mail contents flexibly with simple markup.
Why to use it
This was recommended on ComicPress.org and it’s always worked for me. This allows you to insert a contact form directly into your website so that you don’t have to send a visitor to an outside email program. They fill out the form, hit send and the them email is sent directly to the email you specify.
Contact Form 7 to Database Generator Extension – This plugin works in conjunction with the plugin above and saves form submissions to a database that you can reference later.
Why to use it
This plugin is a great way to generate leads if you’re building a fanbase and want to contact them. Ok, so this one kind of made me a little wary at first, but someone has contacted you directly, so they’re offering up their information. Hopefully that means their interested enough that if you send out newsletters or something they’ll want to hear from you.
Plugins to enhance your social media
Wordbooker – It provides integration between your blog and your Facebook account. It also lets you add the Facebook like/share buttons after posts or on pages.
Why to use it
I’m not a huge Facebook person, but some people are. Online graphic novels are about developing a community and right now, that’s Facebook. The easy integration with the website along with being able to add the like/share buttons made this incredibly useful.
Twitter Tools – A complete integration between your blog and Twitter. Bring your tweets into your blog and pass your blog posts on to Twitter.
Why to use it
Twitter has really taken off in the past couple of years. The ease of connecting your blog with Twitter to add tweets with no extra work is incredibly handy and delivers notifications to your followers in a convenient way.
WP-Twitter Retweet Button – This installs the official Twitter button after posts to let people easily retweet it.
Why to use it
The obvious reason to include a retweet button is to allow readers to easily pass the content along to others. I picked this plugin in particular because it comes withPNG graphics. Why is this important? If you’ve designed your site with a background image that fills up the screen, having a retweet image that has a white box around it looks horrible. It took me a little digging and trying out different plugins to finally find one that solved this problem.
AddThis – Easily allow your users to promote your content by sharing to 330 of the most popular social networking and bookmarking sites (like Facebook, Twitter, Digg, StumbleUpon and MySpace).
Why to use it
So we’ve got Facebook and Twitter covered, but what about the rest of the social media sites out there. To be honest, there are so many and new ones keep popping up all the time. AddThis solves some of these problems by giving you a convenient way to let the user share stuff from your post in one tool.
Getting started
Each plugin will require different amounts of work to get fully operational once you’ve installed them. Some may work as soon as you install them while for others you may be asked to enter information or add pictures, etc. I’m not going to go through each of the plugins listed above, but if you have questions (or problems), post something in the comments below and we can try to figure it out.
Depending on your web service provider, some plugins may have been included when you installed Wordpress but for the purposes of this tutorial, let’s assume none were pre-installed. So let’s go through the process and install one plugin from above.
1.
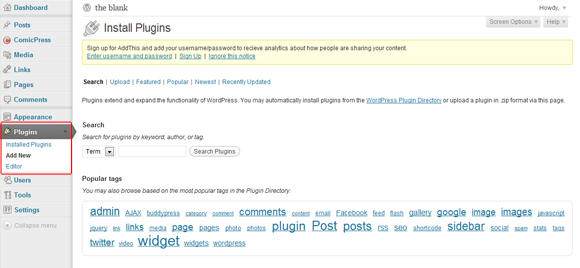
The first thing we need to do is to get to the Plugins page. Click on Plugins on the left-hand side of the Wordpress Administration page. This will take you to the main Plugins page. Next click Add New (either at the top of the page beside the word Plugins or on the left-hand side below Plugins) to take you to the plugins search page.
I want to get started on social media right away for the Blank, so I’ve decided to install AddThis. Type “AddThis” into the search field and the top hit in the results should be the correct plugin. Click Install (it will ask you if you really want to install it, so click OK) and this will take you to a new page where you want to click on Activate Plugin to finish the installation and you’re automatically returned to the main Plugins page.
2.
Now we need to set up the way the plugin looks and works. Plugins appear in different places in the Administration panel so you may have to look for them at times.
AddThis is under Settings, so click Settings on the left-hand side and then click AddThis to get to the right page.
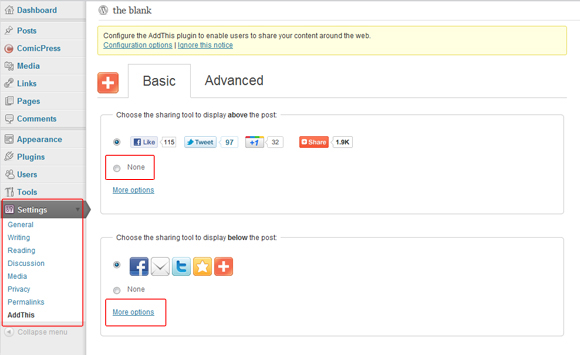
From here we just need to decide how we want the plugin to look. I don’t want anything to appear above a post, so I selected None in the top box. For the bottom box, I’m not a fan of the default, so I clicked More Options and then picked the sixth one down that includes buttons to let the reader share on Facebook, Twitter, Google+ and then a general “share” button with other social media sites. You can preview this to see what it looks like (there’s a button at the bottom of the page) or if you’re happy with your choice, click Save Changes to finish the process off.
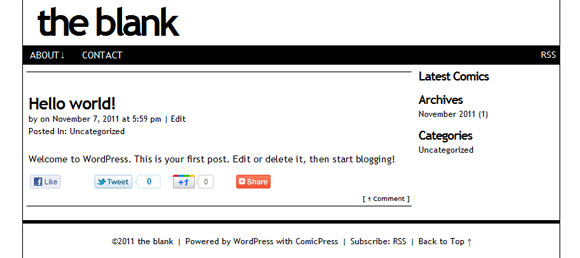
If you open up the site in a new browser window, you’ll see that the plugin is working.
Plugin away!
This list here is just the tip of the iceberg and a good place to start out. There are so many different plugins available – usually there’s more than one for what you’re searching for – I’d suggest you look around either WordPress.org or in the Plugins section on your Admin page, do some research and test them out. There’s probably exactly what you need just waiting for you to find it.
______________
If you missed a part of this series, here they all are:
So You Wanna Publish a Webcomic? – Part 1
So You Wanna Publish a Webcomic? – Part 2
So You Wanna Publish a Webcomic? – Part 3
So You Wanna Publish a Webcomic? – Part 4
So You Wanna Publish a Webcomic? – Part 5
Thanks for the technical articles (my favourite part of this website), I may consider giving these a try. I want to ask though, did you encounter much difficulty installing each of these plugins, or were they self-explanatory and easy to follow instructions for the most part?