Most comic book scripts are a series of panel descriptions intended for the artistic team. The script is your way to communicate to your artists—it’s a technical document, not intended for your audience nor designed to make people laugh or cry.
But gone are the days where one might pull the script out of Ye Olde Typewriter and stuff it in a manila envelope, lick the stamps, and send it on its way—never to be seen again. With advances in technology—Adobe and Wacom, email and shared drives, Skype and smart phones—the way we make comics has changed considerably. This article is intended to help you (the writer) clearly communicate your ideas to an artist in the digital age.
***If you’ve reached the point where you’re actually writing a script, I’m going to assume that you’ve taken the proper steps to get there. Please read the standard disclaimer below.
Panel descriptions are the last step in a long creative process for a comic-book writer. You may have some great images in mind, but you also need to have characters, story, and a lot of other things before you start banging out panel descriptions. Please make sure before reaching the panel description phase that you’ve mapped the characters, broken the story, done your page-by-page outline, made a rough layout, came up with a killer ending (which exemplifies your world view), and ran the script past an editor. You will also need to study pageflow, how many panels can be put on a page, gutter time, match cuts, and the impact of splash pages versus densely-paneled pages on reading flow. If you haven’t done these things, you’re going to be wasting time and money by writing panel descriptions and producing pages that aren’t ready for print. Story is king, and your characters drive the story. Get it right the first time.***
Have you already made character trees? Outlined the story? Great! Now it’s time to communicate your genius to the rest of the creative team—page by page, panel by panel. This part may be the most excruciating step for any writer; it essentially turns your artistic vision into a VCR instruction manual. Scriptwriting in comics has traditionally been dominated by two schools—the panel-by-panel method [elsewhere referred to as “full-script method”—Ed.] and the “Marvel” way of outlining a story and adding the dialogue later (after the art is complete). With the Internet, there are even more ways to get your ideas across to your artists—more ways to see your comic develop. You have options beyond writing panel-by-panel descriptions now. However, the importance of clear and concise panel descriptions can’t be overstated; you’ll save yourself time and money by getting this part right from the outset.
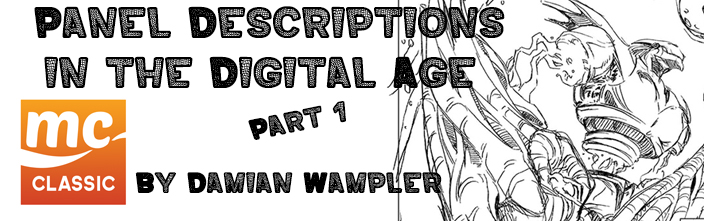
I set the pace and flow of the story by the number of panels, the arrangement of action, and by the time difference between panels. As the writer, it is my job to establish the dramatic tension, so I envision the page well before I write panel descriptions. For example: if I want a large anchor panel in the middle of a page that draws the eye to it—or a series or small, rapid-fire panels—I should plan the page turns and dramatic withholding of info well ahead of time. The artist will need to make a complete page that works as a single thought.
You should be able to hang a good page on the wall like a piece of art. Both the writer and artist must communicate to make that happen. The writer establishes a vision and concept, while the artist must be able to provide constructive feedback and even experiment herself.
Set Expectations
Before writing full panel descriptions, make sure your artist has enough visual direction to design the world you are creating. For example: surf the web and download dozens of images that match the tone and style you’re going for. Don’t be reliant on comics for reference but instead seek inspiration from other sources, like movies, concept art, magazines, personal photographs—anything. Zip your reference imagery up and send it to your artist. You’ll also want to write a comprehensive character description and send it to your artist ahead of the script. Next, the artist would generate some character sketches based on this reference. Once the design of your characters is nailed down, you won’t have to constantly describe them in your script—only which outfit they are wearing and any changes to the norm.
For example:
Panel 1. HARRY’s jacket is soaking wet.
We already know that Harry’s standard costume is a short leather steampunk overcoat (from the character design phase) so we can move on. If your artist is working for-hire, you might consider including the number of character-design sketches in your contract.
Now, on to panel descriptions right? No, not yet. Before that, in the outline stage, you would take a lined piece of paper, write page numbers on the left side, and write a one or two-sentence summary of each page to the right (like this). There are any number of other ways. I treat each page as one “idea” and a standalone piece of art. With each page I try to make one main “point” or show a change in “value” (not moral values, but values in the McKee sense like a state or condition—free to trapped, strong to weak, poor to rich—more here) or leave some cliffhanger or point of no return. The page summary might be more effective (if you send it to your artist in paragraph form) than sending only the panel descriptions. For example, you can email your artist:
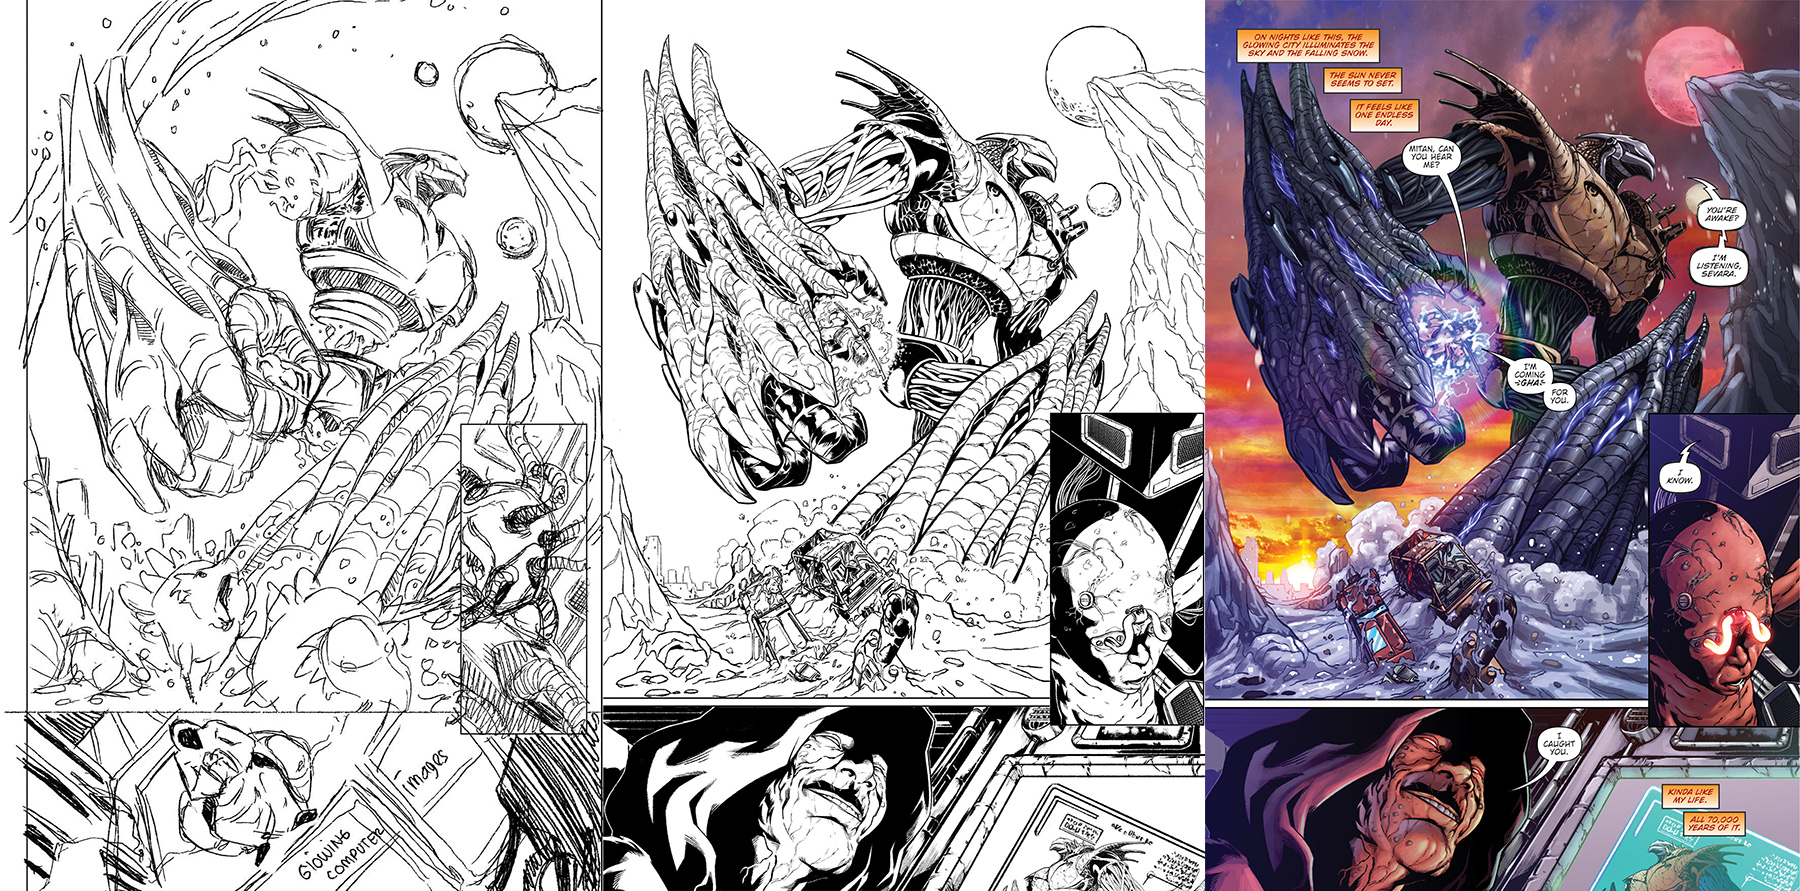
On this page, Alathea begins as wounded and helpless on the ground. Sevara heals her wound, but instead of thanking her or asking Sevara a bunch of questions, she crawls over to her attackers. Sevara isn’t sure what Alathea will do as she inspects the downed men, but doesn’t expect anything dramatic. Alathea, while talking about King Mitan, is overcome with rage and grabs a stone knife, raising it over her head.
Look at the “value” changes. Alathea goes from hurt to healed, weak to strong, confused to lucid, calm to angry. That passage is from my outline for the page, and it was important to share this summary with the artist. If the artist is focused on each individual panel, the concept of the page as a whole could be overlooked—forest for the trees. The page description also helps the artist to understand the significance of the page within the story, and in turn they may suggest a better way of handling things visually. I’ll still send panel descriptions, but this approach blends the panel-by-panel method of writing with the “Marvel” way of writing page descriptions and letting the artist figure it out. These days, I send the script in an email but write page summaries for upcoming pages as Facebook messages. Why not? It’s free—no stamps to lick!
__________________________
Check out more of Damian Wampler’s work here! And also be sure to take a peek at Damian’s graphic novel, Sevara!
I like the most the style of the artist…I do think that the way of the graphic solution is so good…however art lets us to interchange opinions to do different strategic visual options…
This reading is very important because show us how to plan the previous sketches and dialogues between the characters…these ones must follow the plot…otherwise the comic does not its achievement…the option of doing a comic book without lettering, only with images is also an alternative to evaluate…thanks…