In my opinion, there are three phases to drawing the figure: gesture, construction, and rendering. None of these phases is independent from the others. Gesture captures the essence of the figure’s pose — it records the kinetic energy of a moment in time. If anything can be said to breathe life into a drawing, it’s gesture. Construction is the phase where knowledge of shape and anatomy are employed to methodically build a three-dimensional figure within the page. This is the part of figure drawing where many of the visual “problems” of the figure — problems that involve not just anatomy but perspective — are solved. Rendering draws focus to issues of appearance, primarily lighting. Proper lighting grounds the figure and accentuates depth.
Often, these phases overlap. Gesture and construction can happen at the same time, with rough lighting and shadows added before either phase is fully resolved. Some people skip construction entirely and rely on rendering to establish the form. However you choose to approach things, know this: gesture is the most important. More than a rough sketch or plan to be finalized later, it is the soul of your drawing. Everything else builds off of it and threatens to diminish its impact.
Weight and Balance
There are several ways to approach a gesture drawing (a lively, energetic sketch). I will discuss these methods shortly, but the best way to introduce the topic is with the role that weight plays in it.
As artists, it’s our job to create a believable image through lines and value. Fundamental to selling that illusion is an accurate treatment of mass. Weight grounds a figure and instantly makes it more believable. The trick is to always imagine the world of your drawing as existing in three dimensions, wholly separate from the page or the drawing itself. When you draw, you are simply recording that scene — in the same way that a camera takes a photograph.
In order to communicate weight (since it can’t be seen directly) you will need to be aware of its effects on the things that can be seen. In terms of drawing the figure, that means an awareness of balance.
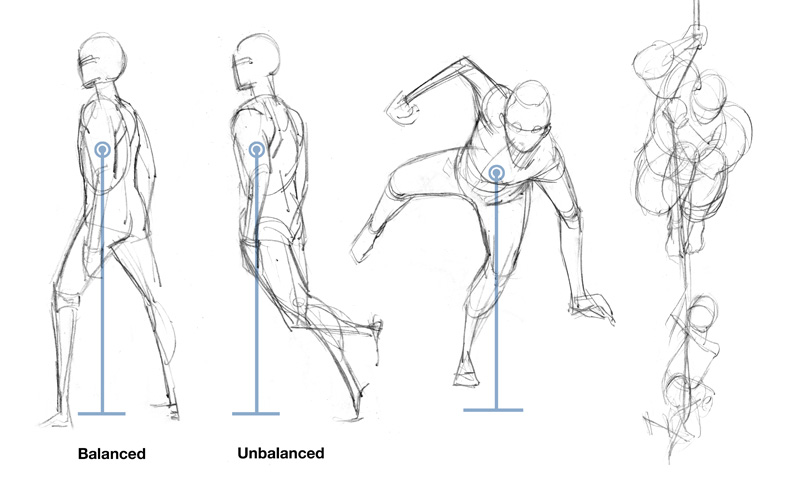
The center of balance for men and women differs — for men, it’s the sternum. For women, it’s around the navel. Keep in mind, these are averages.
In order for a figure to be in balance, there must be an even distribution of weight around this center point. If not, as in the second example above, the figure is unbalanced. This is not necessarily a bad thing — perhaps the figure is in motion and reacting to gravity. Unbalanced figures can be dynamic and interesting. But if the figure is intended to be static, this breaks the realism of your drawing.
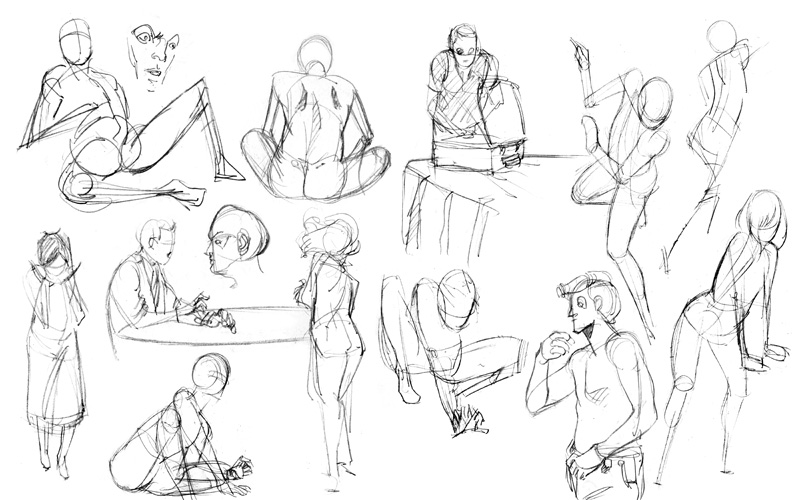
Line of Action
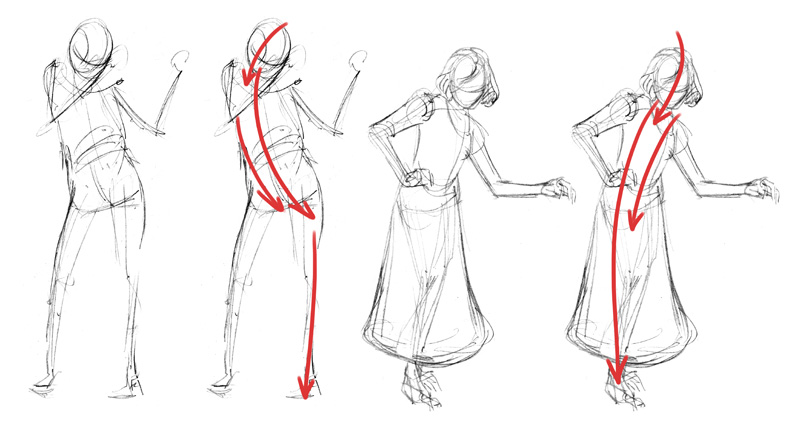
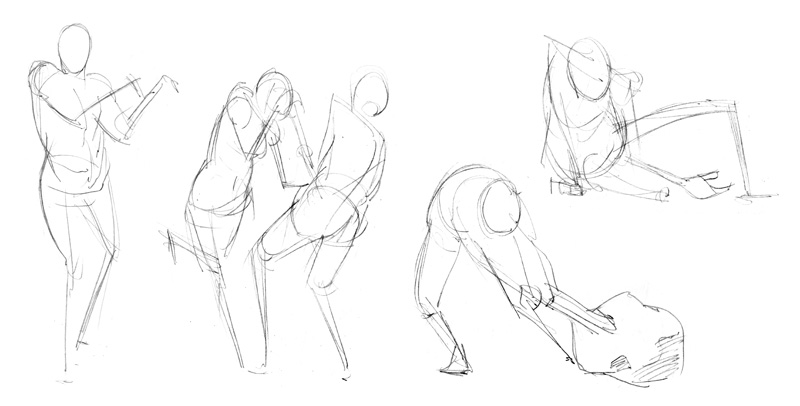
To accurately capture gesture, you will need to understand the motion at work in the pose. In most cases, there is a clearly “felt” transfer of movement that starts with the head and carries through the torso towards the supporting leg. This general sweep of motion is often referred to as the “line of action.”
You can choose to lightly sketch this line if you like, though I generally do not. The line of action doesn’t correspond to any actual contour of the figure. Instead, try and feel the movement as you draw — the shift of weight, the “attitude” of the pose.
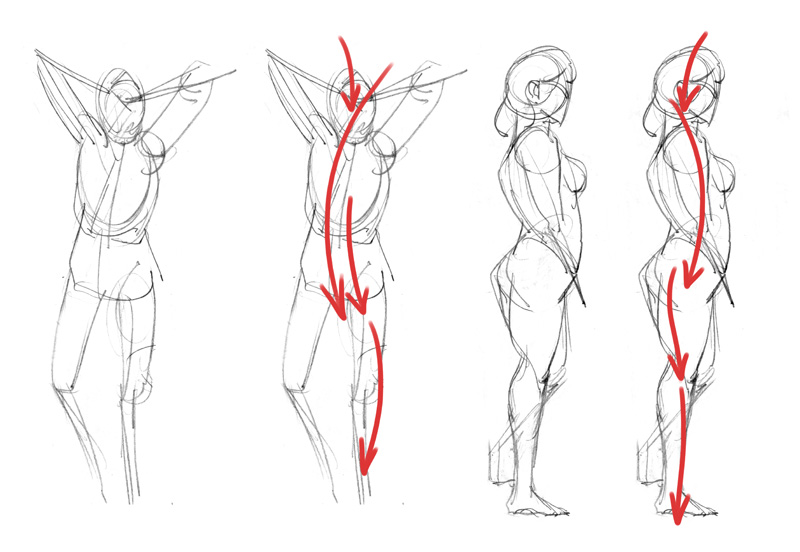
You may have noticed that these lines of action are rhythmic and undulating. This is how motion generally transfers throughout the body — in a side-to-side fashion. Muscles operate this way; one side flexes while the other side relaxes. Look for it.
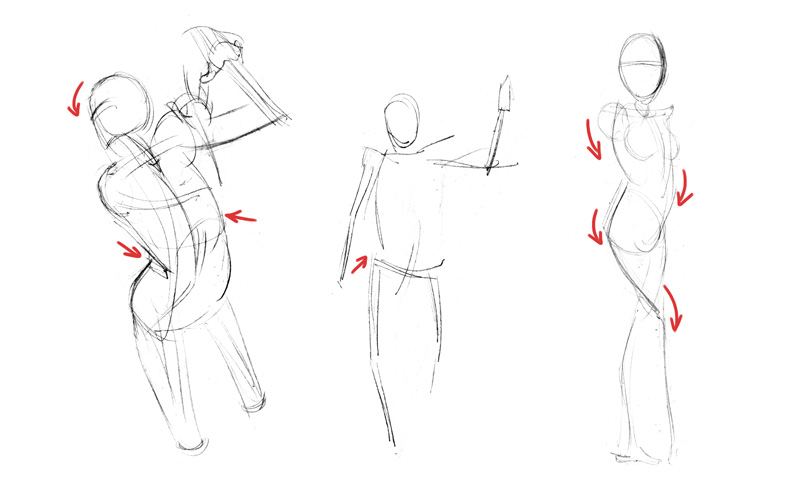
In the examples above, the arrows draw attention to points where shifting weight influences the line of action. Note the side-to-side transfer. Every movement has an affect on the opposite side.
Study the examples below and picture the lines of action. In the gesture phase of drawing the figure, it’s encouraged that you exaggerate this action to sell the attitude and movement in the pose. Everything past this point has the potential to undermine the action and cause the figure to grow increasingly stiff.
Stick-Figures
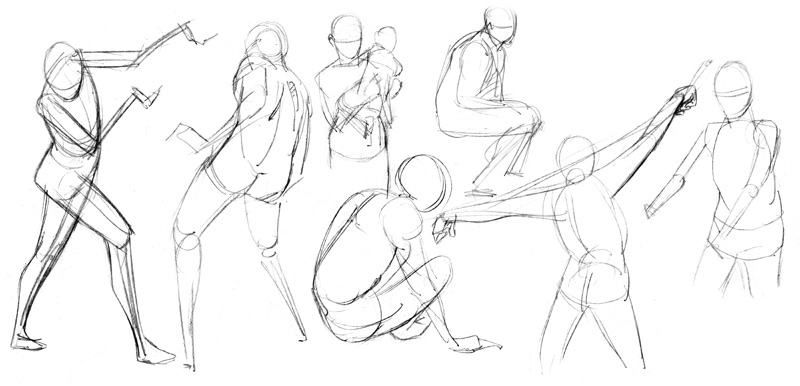
Let’s get into the real “meat and potatoes” of how to actually draw the figure. Gesture, like art itself, can be approached in any number of ways. One common method is to draw a modified stick-figure to block out the pose.
Start by drawing an oval for the head. As you study the head more, you can modify this oval to look more realistic (rounded cranial area, chin wedge, flattened facial plane) but in the gesture phase, an oval will suffice. Wrap a line around the oval to indicate eye-placement. Then, sketch the curve of the spine. For all intents and purposes, this is the line of action. If you prefer, you can extend it to the feet to get an overall sense of proportion for the total figure. Some people like to place two dots to guide them — one at the top of the head, and the other where they estimate the feet to be. The most important thing is awareness of proportion from here on out. Refer back to this article as needed.
The spine is critical to capturing gesture because it determines, to a large extent, what the gesture is. The main “attitude” of a pose is reflected by the direction of the head and the twist of the spine. Next, indicate the tilt of the shoulders and the pelvis to block out the full torso.
From there, add the limbs. You can leave them as little more than sticks if you like. I tend to give my upper-arms/upper-legs a little thickness and terminate those limbs in hands and feet. The hands need not be complex: circles or wedge shapes will do. The feet can be wedge shapes as well.
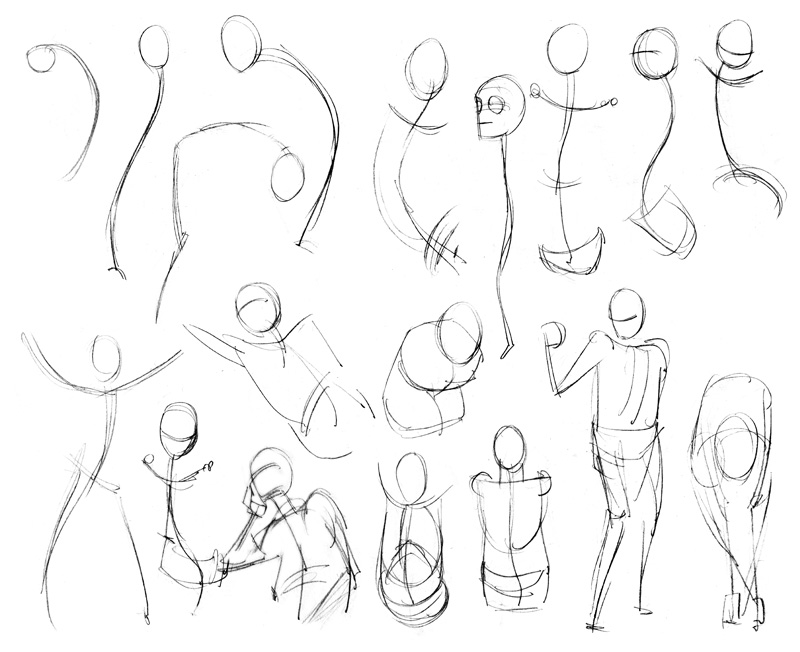
As you grow more comfortable, feel free to skip or modify certain aspects of this process. I tend to put down a torso with some mass, and then flesh out the pelvis/rib cage situation.
Don’t concern yourself with catching or correcting mistakes. The focus should be on capturing the pose as accurately “felt” as possible (imagine how the pose would feel to you). Correcting comes later.
Energy Scribbles
I came across a book a few years ago by a man named Kimon Nicolaïdes called The Natural Way to Draw: A Working Plan for Art Study. In it, he lays out a pretty hardcore curriculum designed to teach new students how to draw that is centered around 300 hours worth of live-model drawing and painting. One of the more interesting things about it is Nicolaïdes’ approach to gesture drawing. He advocates the use of something a student referred to as “energy scribbles.”
While not dissimilar to stick-figures, this method of drawing wanders and is much looser. You will want to proceed in the same order as when drawing a stick-figure (head, torso, limbs, hands/feet) but the primary focus should be on transmitting the raw energy of the pose to the page. Whereas I would de-emphasize drawing the line of action in a stick-figure, this is basically a requirement of energy scribbles. Let your pencil churn throughout the figure while you feel the kinetic energy in the pose.
Obviously, this is a messy method of sketching. Don’t worry about that — no one will see your gesture drawings but you (unless you decide to write an article about the subject for the internet). There’s no reason to be self-conscious!
Free-form Gesture
Other forms of gesture are harder to quantify. If you’ve developed an advanced knowledge of anatomy — and with practice — you may feel confident enough to skip any sort of “framework” for the figure and directly start to sketch the subject. There’s frequently an overlap with the construction phase during this because you can work out some of the details without losing the spontaneity of the drawing.
This is the method I usually employ, if this can even be called a method. I hybridize certain things from stick-figures (simplified limbs, simplified head), while trying to capture the looseness of the gesture through a more selective use of contour lines.
Contour, by the way, is another method of drawing that focuses on tracing the pencil over the outline of the subject. Practitioners of contour drawing are encouraged to imagine that their pencil is physically touching the person/object. All lines committed to the paper are therefore outlines of form.
I find when I’m really in the zone, my gesture drawings tend to become more like contour drawings. I don’t make much distinction between gesture, construction, or rendering. Not to flatter myself by comparison, but the professionals I emulate seem to do this too. The goal seems to be reaching a point where no distinction is made between technique and subject. You just draw.
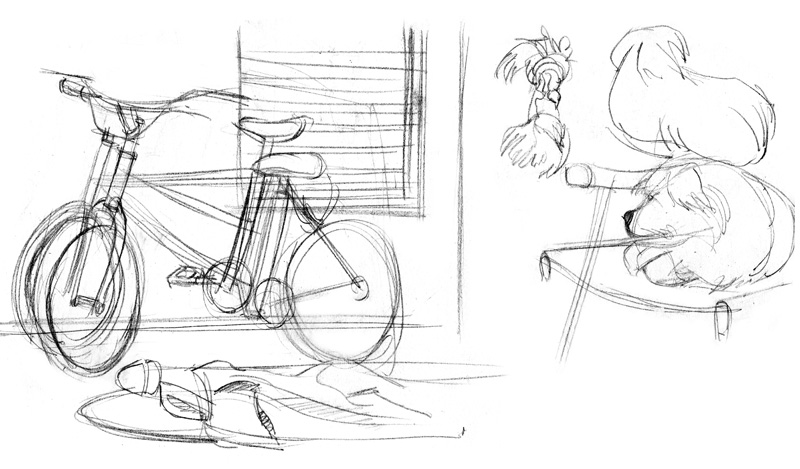
Non-human Gesture
All of the techniques that you will learn on how to draw the figure apply to everything else that you may want to draw. Animals, houses, cars, plants — anything you will ever need to draw is the same. We focus on the figure because we’re narcissistic and we’re interested in things that look like us. Also, people are usually the subjects of our stories. It makes sense.
I’m here to challenge you now: draw the other things too. Draw them with the same interest and intensity that fuels your figure drawings. As you can see below, gesture applies to non-human subjects as well.
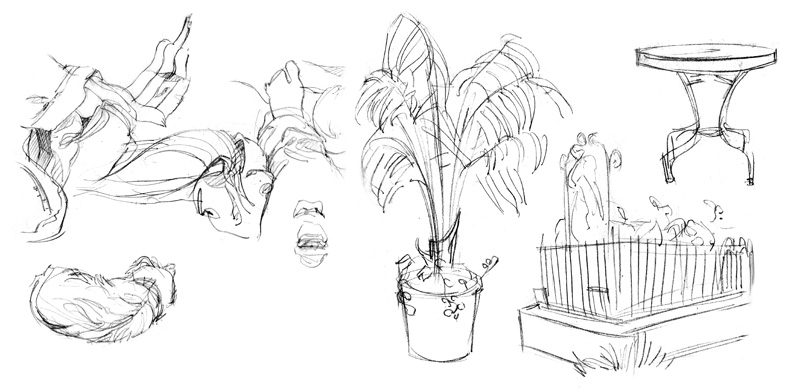
You may find this difficult and challenging at first. This is only because you have less practice at it. Some subjects require a knowledge of perspective to approximate correctly, like furniture, buildings, or cars. Do the best you can, and keep your sketches light and loose for the time being. Articles will follow this one that cover the rules of perspective.
Further Study
Whenever you can, try to draw from life. If you don’t, you will miss out on all of the targeted observation that’s needed to learn about weight and form. It’s simply a requirement if you are serious about improving as an artist. Find a life-drawing class or Meetup group and devote some time to invest in yourself.
If you can’t afford to take a class or attend a workshop, or if there’s simply no local options available to you, try an online resource like Posemaniacs. It has a number of excellent features including an automated pose slideshow and manipulatable 3D models.
Books to check out: Figure Drawing Design and Invention by Michael Hampton (as always), The Natural Way to Draw: A Working Plan for Art Study by Kimon Nicolaïdes, and the Vilppu Drawing Manual by Glenn Vilppu. I’ve fawned over how great Hampton’s book is before, so we’ll skip that. Nicolaïdes, as I said, structures his book as a classroom curriculum. It assumes you have access to a live model and is Not For Everyone. Vilppu is a really great resource. Whether you read his book or find his video tutorials online, he has a straightforward, gesture-based approach to teaching figure drawing that is perfect for animation.
Additionally, get in the habit of carrying a sketchbook if you’re not already doing so. Draw in it whenever you have a spare moment, or if a particular sight or thought strikes you. Having it around will encourage you to draw more frequently, which will cause you to improve. It’s a vicious cycle!
So, where’s your sketchbook? If I see you, I’m asking.
makingcomics.com
Amazing.
I recently bought Force:dynamic life drawing for animation, and fell in love with it. It’s mainly about gesture, although the word seems to stay unmentioned. The goal of the book seems to be how to integrate other drawing knowledge without loosing gesture as the main focus. It’s by far the best introduction to line quality within a single form I’ve come across, although line quality is not mentioned, too. Why the subtitle mentions animators is an enigma, I feel it would be highly useful to anyone doing life drawing. (It also has chapters on clothing and animals, but I have not yet started on these. The first chapters will keep me busy for quite a while, still.)
Thanks Frank! I’ll have to check that out. Animation-leaning books are great for learning gesture because they put so much importance on weight and motion (for obvious reasons). I was flipping through one yesterday called The Animator’s Survival Kit by Richard Williams that I was given as an animation textbook at one point, and it has a lot of useful information about gesture. Likewise, I recommend everyone check out both volumes of Drawn to Life by Walt Stanchfield. Collectively, they represent decades of learning “tidbits” that Stanchfield passed on to the animators he trained at Disney.
This is insanely comprehensive! Such good stuff.
AGAIN with the well written and fun article. With sketches. I always feel inspired by your articles. And your sketches 🙂 Thanks!!
I have found these videos incredibly useful for learning about gesture:
; list=PLtG4P3lq8RHGuMuprDarMz_Y9Fbw_d2ws
He also has more detailed ones if you pay.
Thanks you! I was wondering if I had cross-wired or mis-remembered terms until I found this article. I read a book a years back about human figure drawing (forgot author/title etc!) but it really changed my approach by starting with exercises that introduced the concepts line of action and gesture. I was looking for resources to refresh these ideas but only had the starting point of a few terms I could vaguely recall. So far I had been bombarded with pins of rather considered and flat ‘gesture’ drawings, and very slow video tutorials of ‘gesture drawing’ which seem to miss the point entirely….. now draw this/now draw that. A good, comprehensive yet succinct explanation of the process! Cheers